
Hi Makers!
I have a remake of one of my free patterns to share with you today. This quilt pattern The HourGlass Patchwork Quilt and was originally posted on my blog on March 20, 2023. I have remade the quilt using Riley Blake's new collection, Santa Fe by Gabrielle Neil Design.
The colors and prints in this collection mirror the colors and feel of the southwest. The color palette goes from creams, golds, terracotta, denim, sunset, navy, rust, and tan.
The HourGlass Patchwork Quilt is the perfect pattern to be used as a Chemo Quilt, a smaller version for a baby quilt, or a quick gift.

The quilt is easily broken down into two blocks. I made eight of each block and then added a 3-inch border around the perimeter of the quilt top.

A key element of this pattern is the quarter square triangle (QST). Below you will find my favorite method.
I like to use the two half square triangle method, however you are welcome to make your QSTs in the method of your choosing:
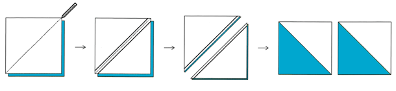
Draw a diagonal line from corner to corner on the wrong side of one background squares {A}. Layer a marked square on an unmarked print square {A}, right sides together. Sew 1/4" from both sides of the drawn line. Cut the unit apart on the marked line to make two half-square-triangle units. Press Open toward the darker print.
Place the HST's from the previous step with right sides together. Be sure to nest your seams and that the prints are facing in the opposite directions. Draw a line from corner to corner opposite of the seamed line. Sew 1/4" from both sides of the drawn line. Cut the unit apart on the drawn line. Press open and for this pattern trim the QSTs to 5 1/2".


Cutting:
Print one [3] 6.25-inch squares for the QSTs
Pint two [4] 5.5-inch squares


Print one [3] 6.25-inch squares for the QSTs
Pint two [4] 5.5-inch squares

For more inspiration, follow me on instagram @neverlandstitches or on Pinterest.
Until next time…I hope you always find something around you that inspires your creativity…
Lisa Jo
Thank you Lisa Jo! I never looked at this pattern in this way before. I love the ombre effect you achieved! Now off to my stash :)
ReplyDeleteYour hour glass quilt is gorgeous !!!!!!!!!!!!!!!!!!!!!!!!!!!!
ReplyDelete