Wednesday, March 6, 2024

Window Wall Quilt - Free Pattern - Featuring Poppie Cotton's Finding Wonder

 Hi Makers!

As Spring is on it's way and we look out the window you can find so much wonder.  This free quilt pattern, Window Wall, is perfect for Poppie Cotton's newest collection, Finding Wonder by Sheri McCulley.  It also work well for any large print fabric so that you can show it off.  

Window Wall


To make this quilt you can use 7 fat quarters, 1 1/2 yards of a solid background fabric 3/4 yard for binding, and 4 yards of fabric for backing..  This sweet throw is 58-inches square.  If you want to make it larger add an additional border or use another fat quarter and add an extra row. 

Cut each fat quarter into three pieces:
    Column One - 6.5 x 20.5 inches
    Column Two - 6.5 x 16.5 inches
    Column Three - 6.5 x 14.5 inches

From the background fabric cut: 
    [6] 2.5 x 20.5 inches for Column One
    [6] 2.5 x 16.5 inches for Column Two
    [6] 2.5 x 14.5 inches for Column Three
    [9] 2.5 x WOF strips to piece together for the column sashing and border.

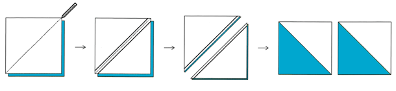
For each column sew together the seven prints and six background strips.  Begin with a alternate a print rectangle and background strip.  End the column with a print rectangle as show in the illustration. Repeat this patter for column two and three.

Sew together three of the 2.5 x WOF strips.  Trim each to 54.5 inches.  Save the remaining background strip for the border.  Use the strips to join together Column one and two and then add an addition background strip to the right edge of column two and add column three. 

Sew together the remaining 2.5 x WOF strips. Trim two strips to 54.5-inches and sew a strip to the left and right sides of the quilt top.  Trim the remaining 2.5-inch strip to two 58.5-inches and sew to the top and bottom of the quilt top.  

Make your quilt sandwich with the backing, batting an quilt top.  quilt as desired on a domestic machine or longarm.  Bind, label, wash and snuggle. 

For more inspiration, follow me on instagram @neverlandstitches or on Pinterest.

Until next time…I hope you always find something around you that inspires your creativity…

Lisa Jo


Monday, February 5, 2024

Poppy Cottons 12 Days of Valentines and An Update to The Scrappy Log Cabin Heart Block

 On today's Poppie Cotton's 12 Days of Valentines I have two sweet quick and easy projects for you using my Scrappy Log Cabin Heart Block.  


First using the original 12-inch block, I made a decorative pillow sham.  I had a 16 inch pillow insert therefore, I made the original block using various pieces of red and pink Poppie Cotton fabrics. 

As a refresher here's the instructions for the original blocks: 

Start out by picking a background fabric or two.  I am making my quilt with three different grey & white low volumes.

Next, gather up some 2 1/2 inch strips of reds and pinks (and any other scraps you would like to include).  Hint:  This is a great way to use a jellyroll!

For one block, you need to cut the following:

Background Fabric:
                A - (1)  - 4 1/2 inch square
                B - (4) - 2 1/2 inch squares - (draw a diagonal line on each)  

Scrappy Reds and Pinks:
                C - (4) - 2 1/2 inch squares
                D -(4) - 2 1/2 x 4 1/2 inch strips
                E -(2) - 2 1/2 x 6 1/2 inch strips
                F -(2) - 2 1/2 x 8 1/2 inch strips
                G - (1) - 2 1/2 x 12 1/2 inch strip

Ready to start sewing?  All seams are 1/4 inch. Press as desired.  I tend to press to the darker fabric.

  • Sew 2 piece 2 - 2 1/2 inch squares together and press the seams.  This is the center of your heart or the beginning of your heart's ventricles for all of you with medical backgrounds.
  • Sew 1 - 2 1/2 x 4 1/2 inch strip to the bottom of the your first two pieces and press.
  • Sew 1 - 2 1/2 x 4 1/2 inch strip to the left side of your heart's ventricles and press.
  • Sew 1 - 2 1/2 x 6 1/2 inch strip to the top of your heart's ventricles and press.
  • Sew 1 - 2 1/2 x 6 1/2 inch strip to the right of your heart's ventricles and press
  • Sew 1 - 2 1/2 x 8 1/2 inch strip to the bottom of your heart's ventricles and press
  • Sew 1 - 2 1/2 x 8 1/2 inch strip to the left of your heart's ventricles and press

Your hearts ventricles should now measure 8 1/2 x 10 1/2 inches.

Now we are going to sew together your hearts atriums.

  • Sew 2 piece 2 - 2 1/2 inch squares together and press the seams. 
  • Sew 1 - 2 1/2 x 4 1/2 inch strip to the top of the your first two pieces and press.
  • Sew 1 - 2 1/2 x 4 1/2 inch strip to the left side of your heart's atriums and press.
  • Easy peasy thus far right?  Next, we are going to get a tad tricky... 
  • Take 1 - 2 1/2 inch square of your background fabric and place it right sides together on the top left corner of the atrium as shown.  Sew on the diagonal line. Trim to 1/4 inch and press up.
  • Take another 2 1/2 inch square of your background fabric and repeat on the top left corner of your heart's ventricles.
  • Take another 2 1/2 inch square of your background fabric and repeat for the bottom left corner of your heart's ventricles.
  • Take the 4 1/2 inch square of background fabric and sew it to the left side of your heart's atriums.
  • Sew right sides together the atrium to the ventricles.
  • Sew the 2 1/2 x 12 1/2 inch strip to the right side of your heart and press
  • Take the last 2 1/2 inch square of background fabric on the top right of the heart and sew on the diagonal line, trim to 1/4 inch and press open.

Tad- da! You have one 12 1/2 inch Scrappy Log Cabin Block completed!

To make a pillow:
Since I was using a 16-inch insert, I added a 2.5 x 12.5-inch strips to each side of the block.  I then added a 2.5 x 16.5-inch strip to the top and bottom.  Press open.

I used a scrap piece of batting and did a very simple quilting following the out lines of the block pieces.  


If you's like to make a 6-inch version of the block for a mug rug  cut the pieces as follows:

Background Fabric:
                A - (1)  - 2 1/2 inch square
                B - (4) - 1 1/2 inch squares - (draw a diagonal line on each)  

Scrappy Reds and Pinks:
                C - (4) - 1 1/2 inch squares
                D -(4) - 1 1/2 x 2 1/2 inch strips
                E -(2) - 2 1/2 x 3 1/2 inch strips
                F -(2) - 2 1/2 x 4 1/2 inch strips
                G - (1) - 1 1/2 x 6 1/2 inch strip

Follow the directions above to assemble the block.

A couple of other ideas are to make four of the 6-inch blocks to create the log cabin heart flower block to make a pillow, to incorporate into a sampler quilt, or to mix and match the two sizes to make an entire quilt. 


A quilt mixing the two sizes would look like this: 


This would be the approximate yardage to make a quilt as shown above you would need one yard of back ground fabric and five yards of red and pink scraps. 

Below is an example of a version that I made a number of a number of years ago using various red and pink scraps and low volume scraps. I mixed log cabin blocks and scrappy log cabin heart blocks together. 


For more inspiration, follow me on instagram @neverlandstitches or on Pinterest.

Until next time…I hope you always find something around you that inspires your creativity…

Lisa Jo 


Tuesday, August 15, 2023

Gears - Crayola Colors Of Kindness - A Twist on Using Panels


 Hi Makers! 

 I am here today to share with a fun modification of my Gears quilt that I made using the newest Crayola licensed collection, Colors of Kindness. It is a wonderfully whimsical inspiring collection filled with inspiration sayings, darling graphics and bright and cheery colors. It's a collection full of the inspiration we all love when a box of any Crayola product is place in front of us even as adult as it brings back memories of when we were a child.

The Colors of Kindness includes three panels in the collection. I used two of the panels in the modified Gears Quilt.


I used the Kindness Cards panel to cut up and use as the center of the Gears blocks. I attempted two different methods of dissecting the the panel.

The first method, I used an 8.5-inch ruler and attempted to fussy cut a grouping of four kindness cards together to use as the center section of the block.

To quote Dan Fogelberg from the song, "Changing Horses", Changing horses in the middle of a stream get you wet... That's what happened to me. I just wasn't thrilled with the way it looked and felt as if to much fabric was being wasted and the blocks were not lining up as I wanted. Therefore, I decided to very carefully cut apart the individual kindness cards. The quilt is going to be used as a nap quilt for the almost two year old this fall at daycare and she's not particulate about there being two different centers to the blocks. She just like to snuggle with quilts (all the quilts, at the same time - LOL).

This was a tad tricky and took patience, but I think the finished blocks were well worth the extra time. I then used 1.5-inch strips to sew together the cards to create a 8.5-inch center for each block. A little window into kindness.

I made each block using the various Colors of Kindness Dots and the center block using Colors of Kindness Crayons.

The large Throw Kindness Around Like Confetti Panel with various colors of RBD basics became the back of the quilt. The remaining Dots became a scrappy and colorful binding.

If you'd like to make your own version of the Colors of Kindness Gears quilt, pick up the collection from your favorite quilt shops and the Gears pattern from my Etsy Shop.

For more inspiration, follow me on instagram @neverlandstitches or on Pinterest.

Until next time…I hope you always find something around you that inspires your creativity…

Lisa Jo 


Monday, July 31, 2023

HourGlass Patchwork Quilt - Featuring Santa Fe by Riley Blake

 Hi Makers!

I have a remake of one of my free patterns to share with you today.  This quilt pattern The HourGlass Patchwork Quilt and was originally posted on my blog on March 20, 2023.  I have remade the quilt using Riley Blake's new collection, Santa Fe by Gabrielle Neil Design.  

The colors and prints in this collection mirror the colors and feel of the southwest.  The color palette goes from creams, golds, terracotta, denim, sunset, navy, rust, and tan.

The HourGlass Patchwork Quilt is the perfect pattern to be used as a Chemo Quilt, a smaller version for a baby quilt, or a quick gift. 

The quilt is easily broken down into two blocks. I made eight of each block and then added a 3-inch border around the perimeter of the quilt top. 


A key element of this pattern is the quarter square triangle (QST).  Below you will find my favorite method.

I like to use the two half square triangle method, however you are welcome to make your QSTs in the method of your choosing: 

Draw a diagonal line from corner to corner on the wrong side of one background  squares {A}. Layer a marked square on an unmarked  print square {A}, right sides together. Sew 1/4" from both sides of the drawn line. Cut the unit apart on the marked line to make two half-square-triangle units. Press Open toward the darker print.


Place the HST's from the previous step with right sides together.  Be sure to nest your seams and that the prints are facing in the opposite directions.  Draw a line from corner to corner opposite of the seamed line.   Sew 1/4" from both sides of the drawn line. Cut the unit apart on the drawn line. Press open and for this pattern trim the QSTs to 5 1/2".


I made an ombre version of the HourGlass Patch Quilt with the fabric collection Santa Fe.  In order to achieve this effect, I carried forward a fabric from block one to block two and so on throughout the quilt. I highly recommend using a drying rack and placing your fabric on it in the order in which you plan on using your fabric. I purchased a plastic shoe rack which is 4.5 feet tall by 7 inches wide and use it to plan out my fabric usage.  I also recommend making one block at a time and using a design board to place your blocks on as you make them. 


The yardage for the version I made is as follows: 


Block 1: 


Cutting:

Background fabric [3] 6.25-inch squares for the QSTs
Print one [3] 6.25-inch squares for the QSTs
Pint two [4] 5.5-inch squares

Follow the directions above to make the five QST. The one extra QST can be carried forward into the next block.  Use the chart above and to make the block.  Trim the unfinished block to 15.5-inch squares.

Block 2: 
 

Cutting:
Background fabric [3] 6.25-inch squares for the QSTs
Print one [3] 6.25-inch squares for the QSTs
Pint two [4] 5.5-inch squares

Follow the directions above to make the four QST.   Use the chart above and to make the block.  Trim the unfinished block to 15.5-inch squares.

Assembling the quilt:
I assembled the quilt top as I made the blocks and as a row was complete I sewed it to the bottom of the previously completed row. 

Alternate the block one and two for each row.
Example: 
Rows 1 & 3 will have a Block 1, Block 2, Block 1, and Block 2
Rows 2 & 4 will have Block 2, Block 1, Block 2, and Block 1

At this point the quilt top will measure 60 x 60-inches.

If you wish to make the quilt slightly larger, you may make more blocks or add a border.  I added a border. 

For more inspiration, follow me on instagram @neverlandstitches or on Pinterest.

Until next time…I hope you always find something around you that inspires your creativity…

Lisa Jo 


Friday, July 14, 2023

Star Trippin' Poppie Cotton's Delightful Department Store


Amy Jordan has designed Delightful Department Store for Poppie Cotton.  It is full of 1950’S ladies all dressed up for the day and ready to head out on the town. This is going to be a glorious day of shopping, looking at pretty things and having lunch with the girlfriends. There is nothing better than spending a day filled with laughter and good cheer. This beautiful collection has mixed yellows, mints, teals and all shades of pinks to create a colorful color palette. The fabric collection includes 1950’s dresses on lovely ladies, roses, ginghams, tiny tossed roses, receipts for the shopping day and all over flower dots. 


The collection was reminiscent of times spent getting dressed up to shopping & out for lunch with my grandmother at JL Hudson’s in downtown Detroit or Jacobson’s in Grosse Pointe.  You knew you were in for some serious shopping when she had an extra pair of shoes. 

Fun fact - Hudson’s Basement, where the bargains were became Target. (https://en.m.wikipedia.org/wiki/History_of_Target_Corporation)
The quilt in a way reminds me of the the escalators in the department stores. 


The Pattern, Star Trippin' will be available in my Etsy Shop on Monday, July 17th.  Meanwhile it you pop over to my Etsy shop now you will find that the entire shop is 15% off for a until July 16th.  

For more inspiration, follow me on instagram @neverlandstitches, my blog Neverlandstitches, or on Pinterest.

Until next time…I hope you always find something around you that inspires your creativity…

Lisa Jo

Monday, July 10, 2023

Box of Hearts with Farmhouse Summer

 I have a fun remake of my Box of Hearts quilt pattern. The hearts have been super sized and the half square triangles on the corners have been eliminated for this version. The quilt was made using Farmhouse Summer by Echo Park for Riley Blake Designs. 


Farmhouse Summer is filled with summer blooms in red, pink, denim, white, and gold. The panel is full of wonderful images and sayings and reminds me of hanging out with friends and family on my parents screened in back porch. 

I chose to have the hearts in my version to face in various directions so that when we are snuggling with the quilt nobody feels like they have the upside down side – LOL!


I worked the panel into the backing of the quilt because those memories are so special. Bonus this make the quilt a reversible quilt.

If you’d like to make your own version of the Box of Hearts Quilt using Farmhouse Summer, the pattern is available in my Etsy shop. Also, grab Farmhouse Summer from your favorite quilt shop and don’t forget to get the panel to add a little something extra to the back.

For more inspiration, follow me on instagram @neverlandstitches, my blog Neverlandstitches, or on Pinterest.

Until next time…I hope you always find something around you that inspires your creativity…

Lisa Jo


Tuesday, June 6, 2023

Jo's & Zoey's Pumpkin Farms

 Hi Makers!

I have two different version's of pumpkin patterns, Jo's Pumpkin Farm and Zoey's to share with you. 

The Jo's Pumpkin Farm was made using Kitty Love Candy designed by Lori Woods for Poppie Cotton.  This fabric collection is so whimsical and sweet.  It's absolutely perfect! 

The original pattern features two different types of pumpkins.  One group is striped and the other group is one solid piece of fabric.  It is a great pattern to use a fat quarter bundle of your favorite fall fabric collection. This version of Jo's Pumpkin Farm is available now in my Etsy Shop


Then I created a Zoey's Pumpkin Farm using Bev McCullough of Flamingo Toes for Riley Blake, newest collection, Haunted Adventure. 

I created a border around the solid piece of fabric pumpkins, tweaked their stems, and created a third block to add to the collection of the Pumpkin Farm with a pumpkin inside the churn dash block.  The pattern with the new modifications with be available in my Etsy. 


Haunted Adventure is the perfect collection for the campers in your life who love Halloween, too. The Collections is filled with pumpkins, campers decorated for Halloween, pick up trucks with quilt blocks, crows, cats, spider webs and spiders, flamingos skeletons, pennants, stars, and stripes. All these prints are done in a beautiful color palette of gray, orange, black, butterscotch, silver, green, white, and jade.

I decided to work with the greens, oranges, beehive, rainforest, white and black to create two different types of framed pumpkins and alternating backgrounds. I think that it is the perfect throw to bring camping in early fall or for sitting by the fire pit this fall in the yard.

I quilted the both quilt myself on my Q’Nique 15R.

If you’d like to make your own version of the either of the  Pumpkin Farm patterns they are both available in my Etsy shop.

For more inspiration, follow me on instagram @neverlandstitches or on Pinterest.

Until next time…I hope you always find something around you that inspires your creativity…

Lisa Jo