Hi Makers!
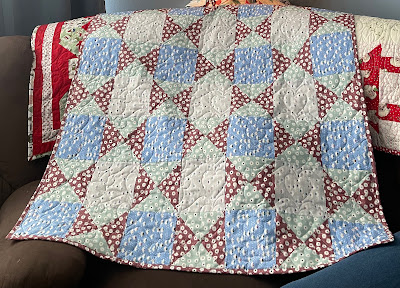
I have a fun versatile pattern for you today. This is my newest pattern that I am calling the HourGlass Quilt. It's the perfect pattern to be used as a Chemo Quilt or a smaller version for a baby quilt.

I used an entire Fat Quarter Bundle of Poppie Cottons' newest collection, My Favorite Things,
to make the 55 x 60 inch lap quilt and backed it with flannel. I did not use any background fabric, however if you's like to make the quilt larger and use the FQB, I suggest using a background fabric for you hour glasses..

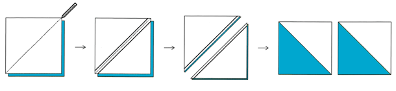
How to make a quarter square triangle:
This is my favorite method, using half square triangle, however you are welcome to make your QSTs in the method of your choosing:
Draw a diagonal line from corner to corner on the wrong side of one background squares {A}. Layer a marked square on an unmarked print square {A}, right sides together. Sew 1/4" from both sides of the drawn line. Cut the unit apart on the marked line to make two half-square-triangle units. Press Open toward the darker print.
Place the HST's from the previous step with right sides together. Be sure to nest your seams and that the prints are facing in the opposite directions. Draw a line from corner to corner opposite of the seamed line. Sew 1/4" from both sides of the drawn line. Cut the unit apart on the drawn line. Press open and for this pattern trim the QSTs to 5 1/2".

Block 1:


Cutting:


For more inspiration, follow me on instagram @neverlandstitches or on Pinterest.
Until next time…I hope you always find something around you that inspires your creativity…
Lisa Jo