Showing posts with label free pattern. Show all posts

Wednesday, March 6, 2024

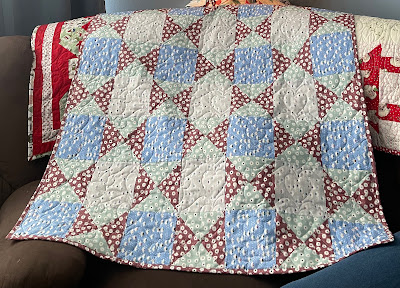
Window Wall Quilt - Free Pattern - Featuring Poppie Cotton's Finding Wonder

 Hi Makers!

As Spring is on it's way and we look out the window you can find so much wonder.  This free quilt pattern, Window Wall, is perfect for Poppie Cotton's newest collection, Finding Wonder by Sheri McCulley.  It also work well for any large print fabric so that you can show it off.  

Window Wall


To make this quilt you can use 7 fat quarters, 1 1/2 yards of a solid background fabric 3/4 yard for binding, and 4 yards of fabric for backing..  This sweet throw is 58-inches square.  If you want to make it larger add an additional border or use another fat quarter and add an extra row. 

Cut each fat quarter into three pieces:
    Column One - 6.5 x 20.5 inches
    Column Two - 6.5 x 16.5 inches
    Column Three - 6.5 x 14.5 inches

From the background fabric cut: 
    [6] 2.5 x 20.5 inches for Column One
    [6] 2.5 x 16.5 inches for Column Two
    [6] 2.5 x 14.5 inches for Column Three
    [9] 2.5 x WOF strips to piece together for the column sashing and border.

For each column sew together the seven prints and six background strips.  Begin with a alternate a print rectangle and background strip.  End the column with a print rectangle as show in the illustration. Repeat this patter for column two and three.

Sew together three of the 2.5 x WOF strips.  Trim each to 54.5 inches.  Save the remaining background strip for the border.  Use the strips to join together Column one and two and then add an addition background strip to the right edge of column two and add column three. 

Sew together the remaining 2.5 x WOF strips. Trim two strips to 54.5-inches and sew a strip to the left and right sides of the quilt top.  Trim the remaining 2.5-inch strip to two 58.5-inches and sew to the top and bottom of the quilt top.  

Make your quilt sandwich with the backing, batting an quilt top.  quilt as desired on a domestic machine or longarm.  Bind, label, wash and snuggle. 

For more inspiration, follow me on instagram @neverlandstitches or on Pinterest.

Until next time…I hope you always find something around you that inspires your creativity…

Lisa Jo


Monday, July 31, 2023

HourGlass Patchwork Quilt - Featuring Santa Fe by Riley Blake

 Hi Makers!

I have a remake of one of my free patterns to share with you today.  This quilt pattern The HourGlass Patchwork Quilt and was originally posted on my blog on March 20, 2023.  I have remade the quilt using Riley Blake's new collection, Santa Fe by Gabrielle Neil Design.  

The colors and prints in this collection mirror the colors and feel of the southwest.  The color palette goes from creams, golds, terracotta, denim, sunset, navy, rust, and tan.

The HourGlass Patchwork Quilt is the perfect pattern to be used as a Chemo Quilt, a smaller version for a baby quilt, or a quick gift. 

The quilt is easily broken down into two blocks. I made eight of each block and then added a 3-inch border around the perimeter of the quilt top. 


A key element of this pattern is the quarter square triangle (QST).  Below you will find my favorite method.

I like to use the two half square triangle method, however you are welcome to make your QSTs in the method of your choosing: 

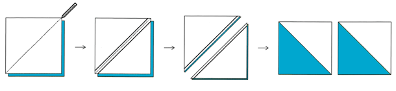
Draw a diagonal line from corner to corner on the wrong side of one background  squares {A}. Layer a marked square on an unmarked  print square {A}, right sides together. Sew 1/4" from both sides of the drawn line. Cut the unit apart on the marked line to make two half-square-triangle units. Press Open toward the darker print.


Place the HST's from the previous step with right sides together.  Be sure to nest your seams and that the prints are facing in the opposite directions.  Draw a line from corner to corner opposite of the seamed line.   Sew 1/4" from both sides of the drawn line. Cut the unit apart on the drawn line. Press open and for this pattern trim the QSTs to 5 1/2".


I made an ombre version of the HourGlass Patch Quilt with the fabric collection Santa Fe.  In order to achieve this effect, I carried forward a fabric from block one to block two and so on throughout the quilt. I highly recommend using a drying rack and placing your fabric on it in the order in which you plan on using your fabric. I purchased a plastic shoe rack which is 4.5 feet tall by 7 inches wide and use it to plan out my fabric usage.  I also recommend making one block at a time and using a design board to place your blocks on as you make them. 


The yardage for the version I made is as follows: 


Block 1: 


Cutting:

Background fabric [3] 6.25-inch squares for the QSTs
Print one [3] 6.25-inch squares for the QSTs
Pint two [4] 5.5-inch squares

Follow the directions above to make the five QST. The one extra QST can be carried forward into the next block.  Use the chart above and to make the block.  Trim the unfinished block to 15.5-inch squares.

Block 2: 
 

Cutting:
Background fabric [3] 6.25-inch squares for the QSTs
Print one [3] 6.25-inch squares for the QSTs
Pint two [4] 5.5-inch squares

Follow the directions above to make the four QST.   Use the chart above and to make the block.  Trim the unfinished block to 15.5-inch squares.

Assembling the quilt:
I assembled the quilt top as I made the blocks and as a row was complete I sewed it to the bottom of the previously completed row. 

Alternate the block one and two for each row.
Example: 
Rows 1 & 3 will have a Block 1, Block 2, Block 1, and Block 2
Rows 2 & 4 will have Block 2, Block 1, Block 2, and Block 1

At this point the quilt top will measure 60 x 60-inches.

If you wish to make the quilt slightly larger, you may make more blocks or add a border.  I added a border. 

For more inspiration, follow me on instagram @neverlandstitches or on Pinterest.

Until next time…I hope you always find something around you that inspires your creativity…

Lisa Jo 


Monday, March 20, 2023

HourGlass Patchwork Quilt - Featuring Poppy Cotton's My Favorite Things

Hi Makers!

I have a fun versatile pattern for you today.  This is my newest pattern that I am calling the HourGlass Quilt.  It's the perfect pattern to be used as a Chemo Quilt or a smaller version for a baby quilt.

I used an entire Fat Quarter Bundle of Poppie Cottons' newest collection, My Favorite Things, 
to make the 55 x 60 inch lap quilt and backed it with flannel. I did not use any background fabric, however if you's like to make the quilt larger and use the FQB, I suggest using a background fabric for you hour glasses.. 

The quilt is easily broken down into two blocks. I made 6 of each block and then added a patch work border to the left and right side of the quilt. 

How to make a quarter square triangle: 

This is my favorite method, using half square triangle, however you are welcome to make your QSTs in the method of your choosing: 

Draw a diagonal line from corner to corner on the wrong side of one background  squares {A}. Layer a marked square on an unmarked  print square {A}, right sides together. Sew 1/4" from both sides of the drawn line. Cut the unit apart on the marked line to make two half-square-triangle units. Press Open toward the darker print.


Place the HST's from the previous step with right sides together.  Be sure to nest your seams and that the prints are facing in the opposite directions.  Draw a line from corner to corner opposite of the seamed line.   Sew 1/4" from both sides of the drawn line. Cut the unit apart on the drawn line. Press open and for this pattern trim the QSTs to 5 1/2".


Block 1: 


Cutting:
Pink Print - [2] 6.5-inch squares for QSTs
Low Volume Print 1 - [2] 6.5-inch squares for QSTs
Low Volume Print 2 -  [1] 6.5-inch squares for center QSTs you will hav an extra for a second block
Yellow Print -  [1] 6.5-inch squares for center QSTs you will hav an extra for a second block
Tan Print - [2] 5.5-inch squares
Red Print - [2] 5.5-inch squares

Follow the chart above and make six 15.5-inch squares.

Block 2: 


Cutting:
Teal Print - [2] 6.5-inch squares for QSTs
Pink Print [2] 6.5-inch squares for QSTs
Low Volume Print - [1] 5.5-inch squares for center 
Yellow Print - [2] 5.5-inch squares
Red Print - [2] 5.5-inch squares

Follow the chart above and make six 15.5-inch squares.

Assembling the quilt:
Alternate the block one and two for each row.
Example: 
Rows 1 & 3 will have a Block 1, Block 2, and Block 1
Rows 2 & 4 will have Block 2, Block 1 and Block 2

At this point the quilt top will measure 45 x 60-inches.

To make the quilt top slightly wider I cut an addition [24] 5.5-inch squares. sews together two columns of twelve and sewed these additional columns to the left and right sides of the quilt top. 


If you choose, you may have all your QST's facing the same direction and give the quilt a different look.
Here's a peek a toddler version I made for on of the grands. 


For more inspiration, follow me on instagram @neverlandstitches or on Pinterest.

Until next time…I hope you always find something around you that inspires your creativity…

Lisa Jo 


Monday, March 7, 2022

Hopscotch & Freckles Zoey's Car Quilt - Free Pattern

 Poppie Cotton has a fun new collection available, Hopscotch & Freckles.  The collection is, bright, fun, and playful.  It has darling prints of little girls doing chores, pinwheels, strawberries, sweet words, and teeny tiny floral prints.  In addition there are the cutest stitching postcards prints.


I decided to use the collection to make a sweet quilt to wrap up my youngest grand daughter in as I carry her out of day care into my car as well as to snuggle her in the car seat.  


I used the stitching card as the centers for each of these very simple blocks.

Zoey's Car Quilt

Finished size: 34 x 38 inches
Finished block size 8.5 x 9.5 inches
Total blocks needed: 16

Materials: 
1 fat quarter of the Stitching Cards print from Hopscotch & Freckles
8 fat quarters of your favorite prints from Hopscotch & Freckles
1 fat quarter of secret words print from Hopscotch & Freckles for binding
1 1/2  yard for the backing

To make each block cut:

[1] 2" x 3" rectangle from the stitching cards

[2] 2" x 3" rectangles print 1

[2] 2" x 7" rectangles print 1

[2] 2" x 6" rectangles print 2

[2] 2" x 10" rectangles print 2

Block Assembly:

  1. Sew a 2" x 3" strip to left and right of the stitching card.  Press open.
  2. Sew a 2" x 7" strip to the top and bottom of the unit created in Step 1.  Press open. 
  3. Sew a 2" x 6" strip to the left and right of the unit created in Step 2. Press open.
  4. Sew a 2" x 10" strip to the top and bottom of the unit created in Step 3. Press open. 
  5. Unfinished blocks measure 9" x 10"

Repeat to make 16 blocks to make the size as show.  You may make more of less if you choose to make a larger or smaller quilt.

Assemble the quilt:
Sew block into 4 rows.
Sew the 4 rows together.


Sandwich your quilt top, batting and batting. Quilt and bind your quilt as desired.  Wash and then snuggle your little one. 
 
If you make this, please tag me on instagram so I may see your quilt.  @neverlandstitches

Hint: I used two layers of batting to make this extra warm for the little one. 

Until Next Time ... I hope you find something today to inspire your creativity...
Lisa Jo


Monday, November 8, 2021

Riley Blake Project Tour - Cooper

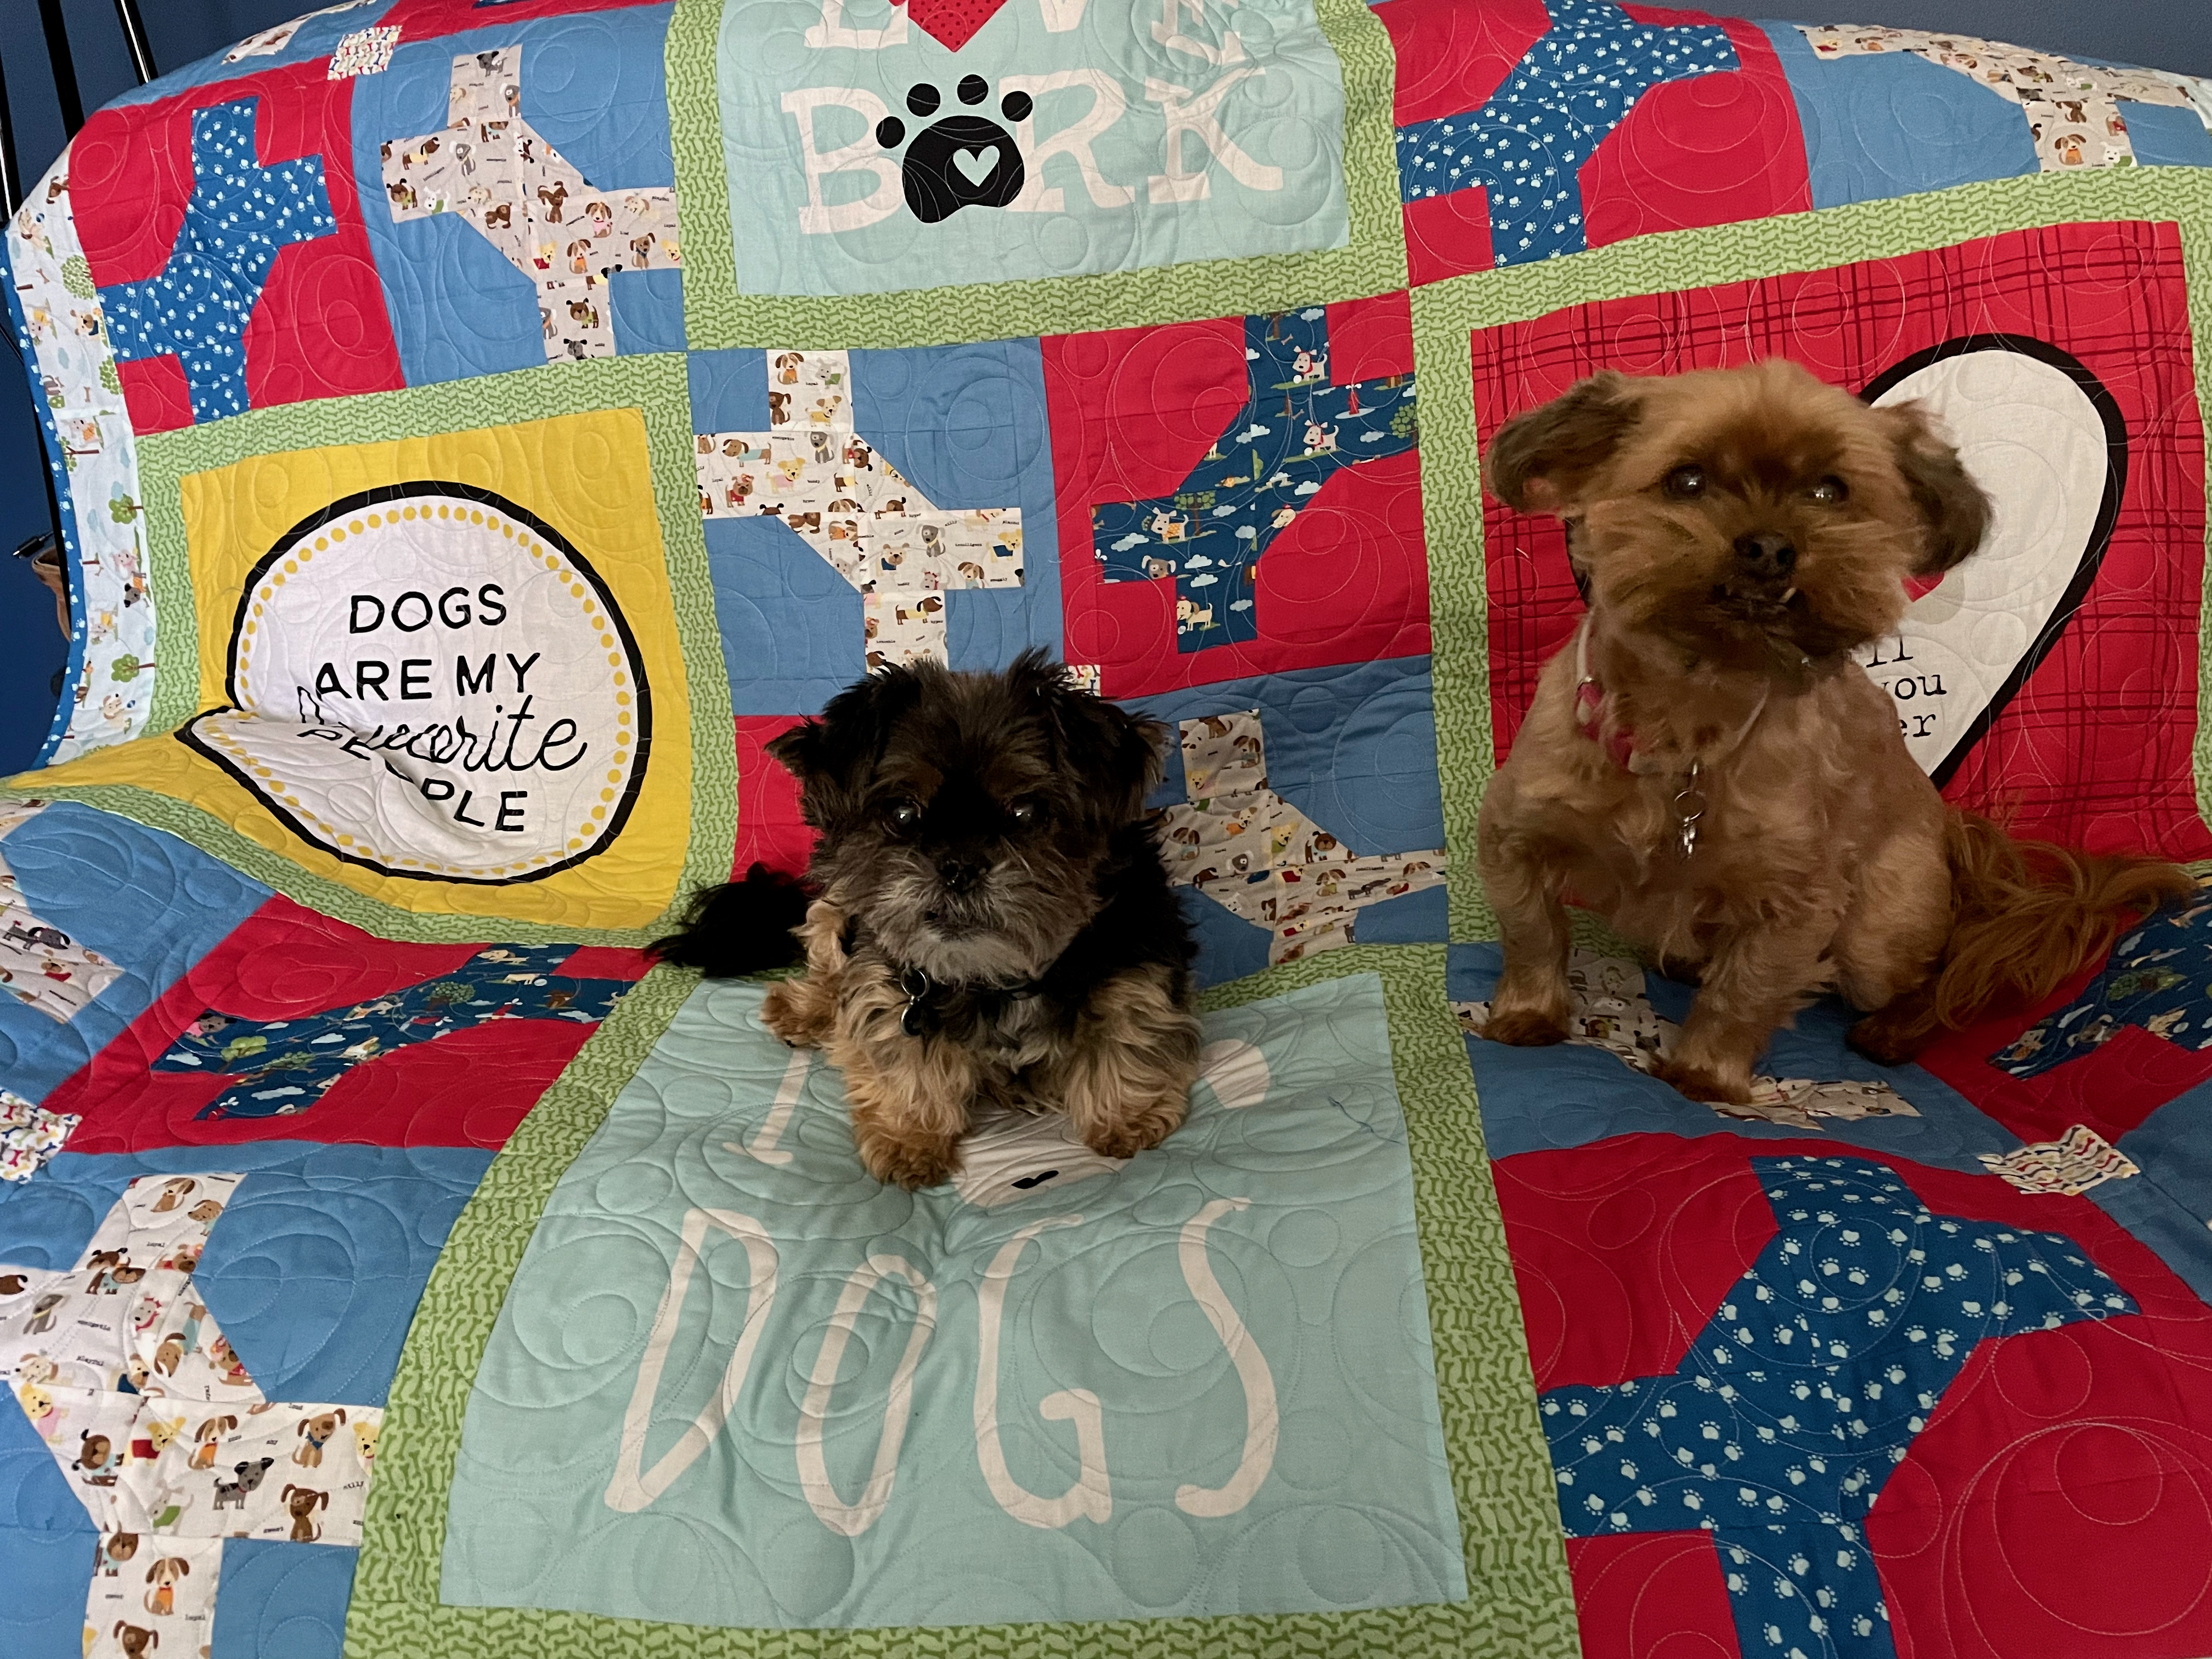
 Stephanie Smokovich of Bella Blvd has designed the cutest new collection that is the "ultimutt" fabric collection for dog lovers called, Cooper.  I had so much fun designing this fun quilt called Puppy Love for a little boy in my family who's name is Cooper.  What a perfect match.  In the meantime, until the quilt is gifted, Blaze and Lady thought they would model the quilt.  

The collection, Cooper, is full of busy little puppies and some sweet coordinating prints with paws, bones, words, and maybe some more busy puppies.  This "ultimutt" collection has uses a furtastic color palette of aqua, green, red, blue and black. 

This quilt, Puppy Love, is the perfect gift for the little dog lover in your life.  

Oh, did I mention that this is a free pattern?  Well, it is and you can click HERE to download the pattern. 


If you make a version of this quilt, please tag me on Instagram as I would like to see your version. 

Until next time ... Happy sewing!
Lisa Jo


Sunday, August 29, 2021

Riley Blake Project Tour - Gingham Foundry


August also marks the release of another Riley Blake Fabric Collection from My Mind's Eye, Gingham Foundry.  this collection is refined and classic.  The color palette consists of navy, honey, mist, beehive, and cream.  The prints in the collection are florals, gingham, vines, stars, dots and text.  


I used the tiny florals, text prints, stars, dots and vines in navy, honey, cream and mist along with a Vintage Blue Shades as the background to create a very sweet throw, Gingham Grannies, which is a modern twist on a granny square block.  


The pattern for Gingham Grannies will be available in my   Esty Shop beginning September 12, 2021  


This is a very easy pattern to piece as there are no flying geese, half square triangles or anything else "fancy"   Alternating colorways makes for an interesting quilt as does the non-traditional background fabric.  

If you make this quilt, please tag me on Instagram so that I may see your version. 

Until next time ... Happy Sewing!
Lisa Jo
@neverlandstitches


Sunday, February 3, 2019

South Channel Stars Quilt

I have a new free quilt pattern for you.  I have decided to call it South Channel Stars after the beautiful night sky on Harsens Island here in Michigan.


South Channel Stars

This quilt measures 70 inches square and the blocks are 20 inches each.

I will be honest, I only have 3 blocks sewn together at this point but a few people have asked if there was a pattern therefore, I decided to publish the pattern.


If you'd like to make this quilt the pattern  which includes the yardage and a coloring page may be downloaded here

Just in case you are impatient, and would like to make a quilt a bit faster.  Here's a 6 block version of the quilt

The link to this version may be downloaded here.

I made this version for a very special young lady about to start medical school.  


Please tag me on Instagram so I may see you blocks & quilt. 

Until next time ... Happy Sewing!
Lisa Jo