Monday, August 26, 2019

Summer's End - At the Seashore Quilt-along with Moda Bake Shop

Summer is almost over as the children and teachers in Michigan head back to class after Labor Day.  Most of the college student have already headed back this past weekend.

The all of the setting and blocks for Moda Bakeshop's Summer Quilt A Long - At The Seashore have been released.  It's been so much fun seeing everyone's progress and wonderful fabric choices.

I was lucky enough to work with April Rosenthal's collection Orchard.


For this summer's Quilt A Long, I  designed one of the blocks this summer called Beach Houses.


Here's a few pictures of my finished quilt: 


I used the layout I created, Summer Nights On The Island, which can be found here on my blog.

I also, was a tad more creative when it came to quilting this quilts as I quilted various different pantos for the different rows in the quilt.  I rotated between sailboats, butterflies and another panto called Moondance. 

Moda Bakeshop selected some wonderful quilters to design the blocks and layouts this summer.  If you have an opportunity, be sure to check out their blogs and social media accounts.

Audrey Mann
{blog: clothparcel.com/blog}
{instagram: @theclothparcel}
{shop: The Cloth Parcel}
{facebook: The Cloth Parcel}

Susan Vaughan
{instagram: @thefeltedpear}

Jessica Dayon
{blog: jessicadayon.blogspot.com}
{instagram: @jessicadayon}

Anne Wiens
{instagram: @sweetgrasscreativedesigns}

Heather Long
{blog: coffeeandquilts.blog}
{instagram: @coffee_and_quilts}

Emily Bailey
{blog: emsscrapbag}  Facebook:  Aunt Em’s Quilts
{instagram: @emsscrapbag}  Shop:  Aunt Em’s Quilts

Denniele Bohannon
{instagram: @dennielebohannon}
{facebook: Louanna Mary Quilt Design}

Christine Weld
{blog: thequarterinch.blogspot.com}
{instagram: @christine.weld}

Lauren Terry
{blog: brightsonwhite.com}
{shop: Brights on White}

Carole Carter
{blog: From My Carolina Home}
{facebook: From My Carolina Home}
{instagram: @frommycarolinahome}

Barbara Esposito
{instagram: @thequiltedb}

Kristin Esser
{blog: Simple. Handmade. Everyday.}
{instagram: @kristin_esser}
{podcast: Simple. Handmade. Everyday. Podcast}

Nicola Dodd
{blog: Cake Stand Quilts}
{instagram: @nicolajdodd}

Jane Davidson
{blog: quiltjane.com}
{shop: Want It. Need It. Quilt!}
{instagram: @quiltjane}

Mona Phelps
{blog: Kentucky Whittaker Creations}
{instagram: @mona.phelps}

Sharla Krenzel
{blog: Thistle Thicket Studio}
{instagram: @thistlethicketstudio}

Mary Andra Holmes
{blog: Sisters Quilting Trunk}
{instagram: @mahquilter}

Until next time ... Happy Sewing!

Lisa Jo Girodat


Friday, August 9, 2019

My Etsy Shop Is Now Open

I am excited to announce that my Etsy Shop is now opened for business.

As of today there are three patterns available for sale.

The first one is Irish Stars. 


Irish stars stared out as a quilt that I designed for a co-worker.  I used various Moda Bella Solids and Lella Boutiques' Lollipop Garden to make my version of this quilt.   

This quilt pattern can be used to make a 64 inch throw and 18 inch pillows. 

Use two different background fabrics to create an interesting secondary block design.

This link will take you right to the listing on the Etsy website. 

The second quilt available is the Pineapple Hospitality Quilt.


This pattern creates a fun giant pineapple quilt.  Pineapples represent hospitality so this quilt would make a great wedding or house warming gift.  

It comes together quickly and if you want you can use up various yellow and green scraps from your stash. 

My version finished at 59 x 68 inches.  The pattern includes options to make the quilt larger and a bonus mini quilt pattern.

This link will take you right to the listing on the Etsy website. 

The third pattern currently available in my Etsy shop is Strawberry Fields.


This pattern creates a fun giant strawberry throw quilt. Make it fun and colorful using various red, pinks and greens from your stash.

My version finished at 63 x 67 inches. The pattern includes a bonus mini quilt pattern.

This link will take you right to the listing on the Etsy website. 

I hope that one of these patterns will inspire you to grab the pattern and start quilting.  If you make one of my patterns, please share it on Instagram and tag me so that I may see your version.  My user name on Instagram is Neverlandstitches

You may also like my Facebook page or request to join my Facebook group.

Until next time ... Happy Sewing!
Lisa Jo


Wednesday, June 12, 2019

Yardage Requirements for Summer Nights On the Island Layout

If you are sewing along with Moda BakeShop's At the Seashore quilt along and have chosen to use my layout, Summer Nights On The Island here are the fabric requirements. 

My requirements are shown using Orchard by April Rosenthal for Moda Fabrics as that is what I will be sewing with this summer.

2 1/2 yards of background fabric


The 2 boarders are each cut at 2 1/2 inch width of fabric. 

Here's what the quilt looks like without the scrappy boarder: 


I suggest using 2 1/2 inch x 12 1/2 inch strips between the blocks for the 12 inch block rows as Susan Vaughan shows in her Sailing Flag Sampler layout.
Without the scrappy boarder the quilt measures 62 x 77 inches. 

If you had wondered how to make 4 at a time flying geese (no waste method) the directions as I provided on Moda BakeShop in my quilt Ribbon Stars are shown below:

Four at a time flying geese:
Draw a line from one corner to the opposite corner on the reverse side of the four 3 7/8 inch squares.
Place two 3 7/8 inch squares on the 7 1/4 square of low volume fabric, RST and small squares in opposite corners.  The lines on the reverse sides of the 3 7/8 inch squares should flow together
Sew ¼ inch on each side of the line.
Cut the piece in half on the drawn lines
Press open.
Place a 3 7/8 inch square in the corner of each unit, right sides together, and marked lines positioned as shown in the photo.
Sew a ¼ inch on each side of the line and then repeat for the second unit.
Cut the piece in half on the drawn lines and then press open.
Trim the four flying geese to 3 1/2 x 6 ½ inches.

Until next time ... Happy Sewing!
Lisa Jo 
Neverlandstitches


Thursday, June 6, 2019

Moda BakeShop's Summer QAL Begins & Summer Nights on The Island Layout


Are you going to sew along with this summer's At The Seashore QAL on Moda BakeShop?  I am!  You can find the fabric requirement and a great worksheet to help keep you organized for the quilt along on the Moda BakeShop website.

I had sew much fun sewing along last year.  I am especially thrilled as this summer, I am one of the Chef's who helped design this summer's quilt.

I will be using Orchard by April Rosenthal for my quilt.


This summer, Moda BakeShop has decided to do this a tad differently, and will show you the various layouts first before the blocks.  Susan Vaughan is first up with her layout called Sailing Flag Sampler.


I will be assembling my quilt slightly differently using a layout I call Summer Nights on the Island.


You may download the instructions for the filler blocks by clicking HERE

I will add the sashing and boarder cutting instructions later this weekend. 

Until next time...Happy Sewing!
Lisa Jo


Sunday, February 3, 2019

South Channel Stars Quilt

I have a new free quilt pattern for you.  I have decided to call it South Channel Stars after the beautiful night sky on Harsens Island here in Michigan.


South Channel Stars

This quilt measures 70 inches square and the blocks are 20 inches each.

I will be honest, I only have 3 blocks sewn together at this point but a few people have asked if there was a pattern therefore, I decided to publish the pattern.


If you'd like to make this quilt the pattern  which includes the yardage and a coloring page may be downloaded here

Just in case you are impatient, and would like to make a quilt a bit faster.  Here's a 6 block version of the quilt

The link to this version may be downloaded here.

I made this version for a very special young lady about to start medical school.  


Please tag me on Instagram so I may see you blocks & quilt. 

Until next time ... Happy Sewing!
Lisa Jo 


Monday, November 26, 2018

Using multiple panto in a single row with Quilter’s Creative Touch 4 by Grace Company

Here's a quick little tutorial on how to use multiple pantos in a single row
with Quilter’s Creative Touch 4 by Grace Company


I love to use multiple pantos on a single quilt.  
I believe it make my quilts more interesting.and personalized.  


To be honest I stumbled upon this by accident or should I say by just playing
with my software on an evening when I was too tired after a day at my day job and
long commute.  Please note that I purchased the software and Quilt Motion. I
was not provided use of it by the Grace Company. I just happen to be a quilter who really loves her
Queen Gracie Frame and Quilter’s Creative Touch 4.I personally use a Juki TL-2010Q
sewing machine on my Gracie Frame so my quilting area is limited,
but then so is my budget. The set up work very well for me.


My methods may not be completely correct, but it works well for me.


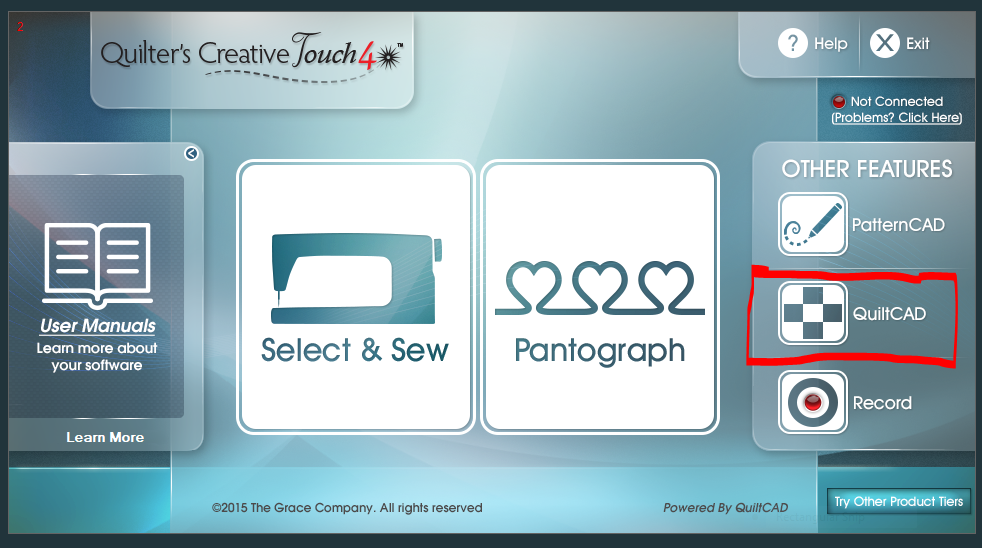
Open your Quilter’s Creative Touch 4 software in simulation mode.
Click on QuiltCAD,


.
Once in QuiltCAD, Click on SIZE and adjust to your quilt width, quilting height
of your matching and block size.


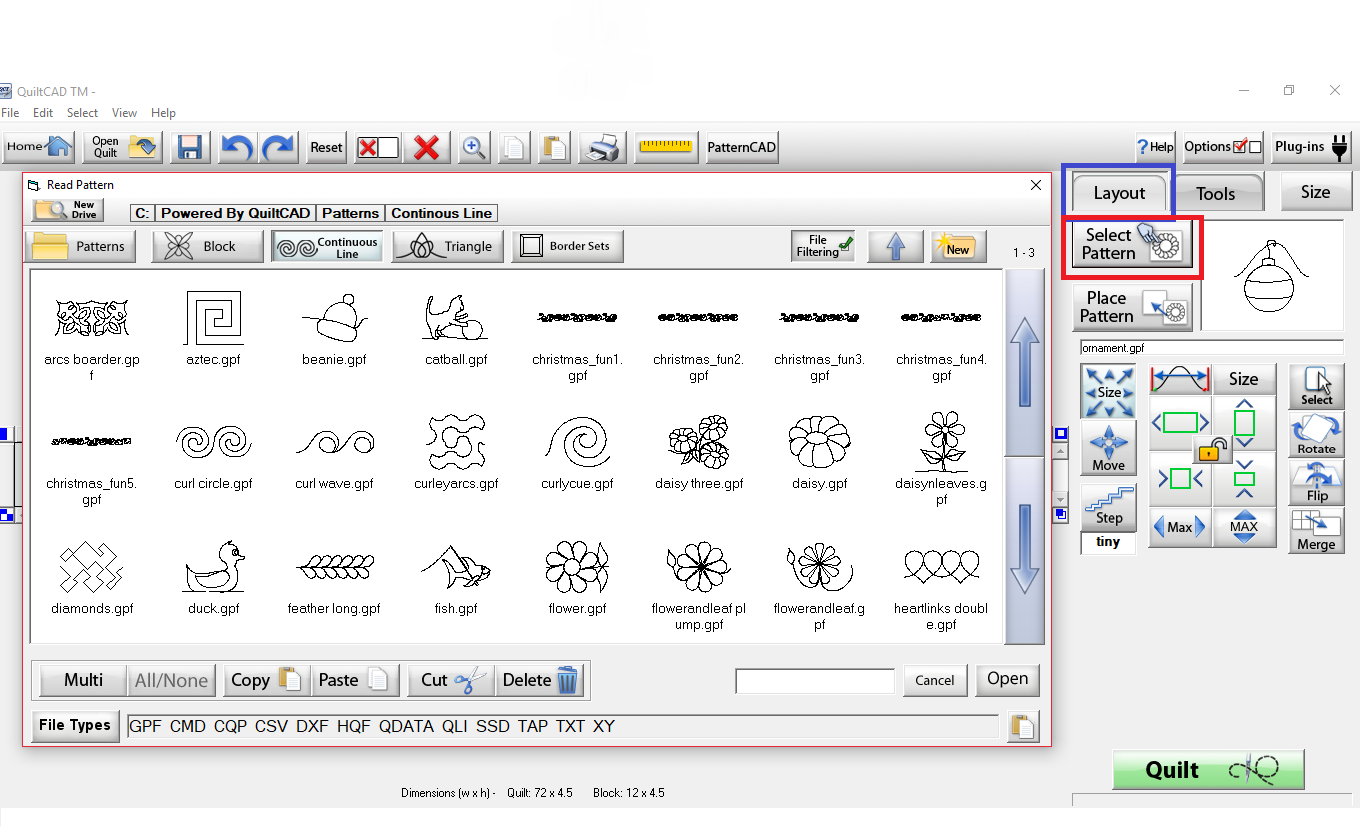
Select the Layout tab (Blue highlighted area below)
Select the first pattern you would like to begin with by clicking on Select Pattern
(Red highlighted area below)


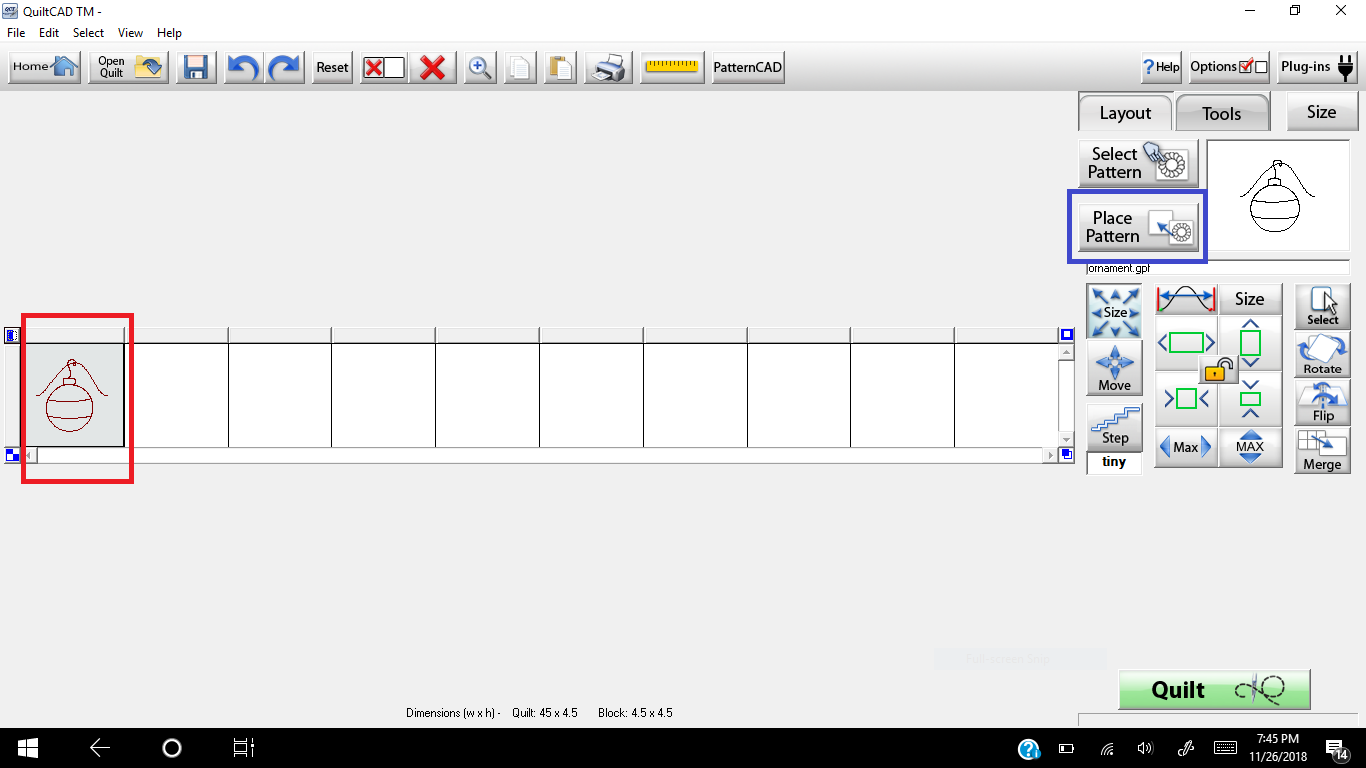
Click on the first section (Red highlighted area in the picture below)
Click on the Place Pattern button (Blue highlighted area)
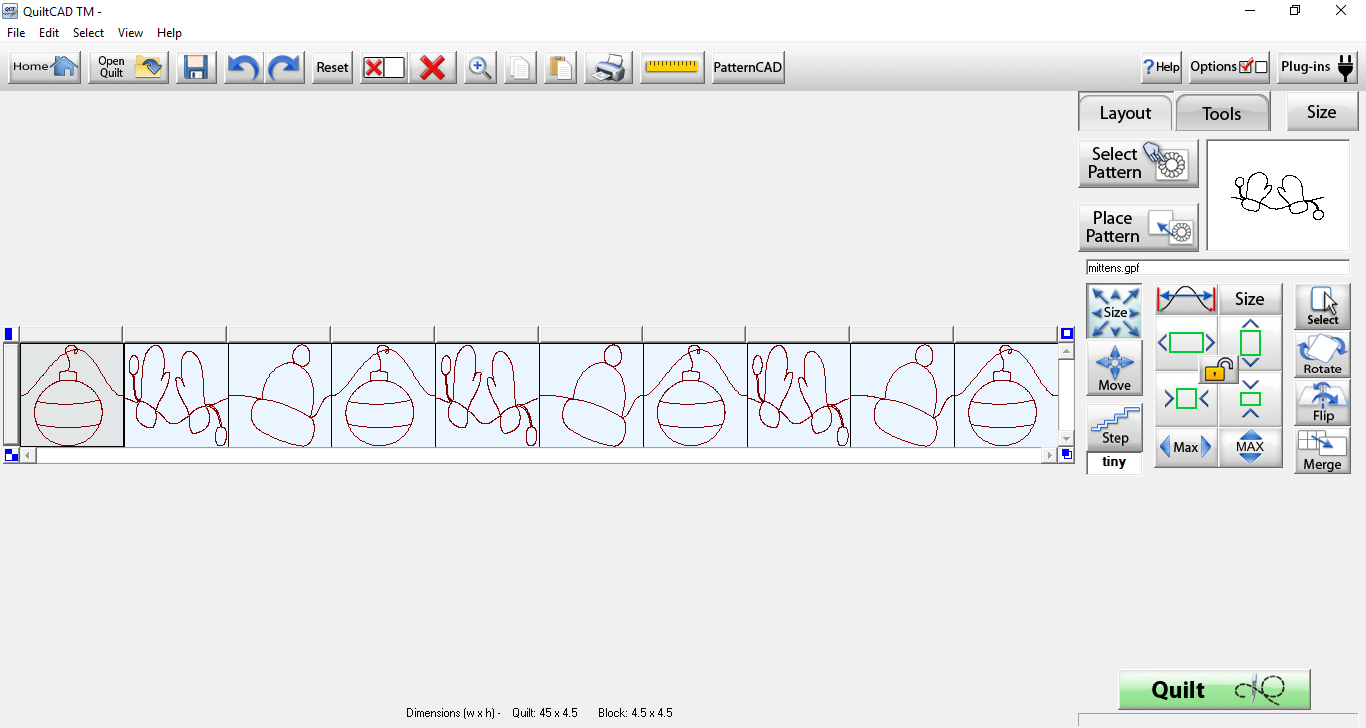
Use the horizontal and vertical MAX buttons to fill the cells as desired.
Continue to place various patterns in each cell to create your customize panto

Click on the bar to the far left on the row so that your entire row is highlighted as shown above.
Click the Green QUILT button on the bottom right.


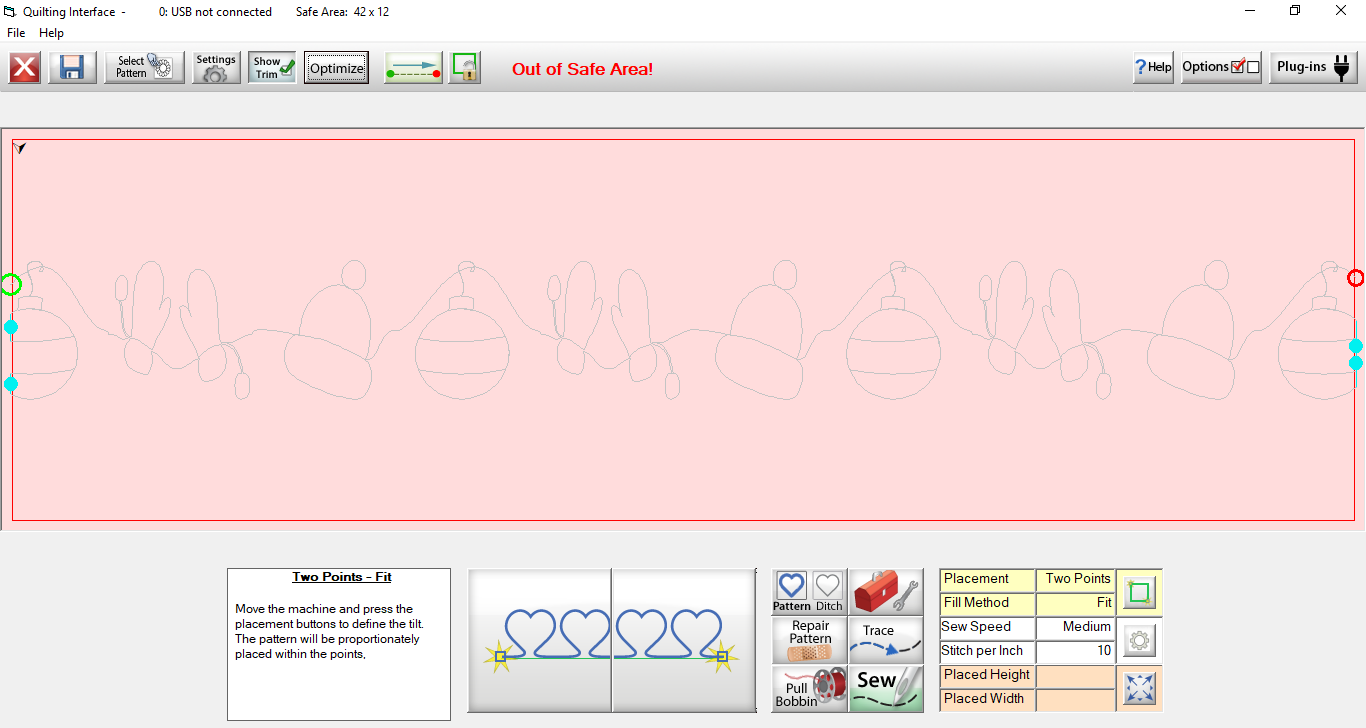
Don’t worry if the software indicates that you are out of safe area because this is just a gateway step.  
Click on the Optimize button on the top toolbar
.
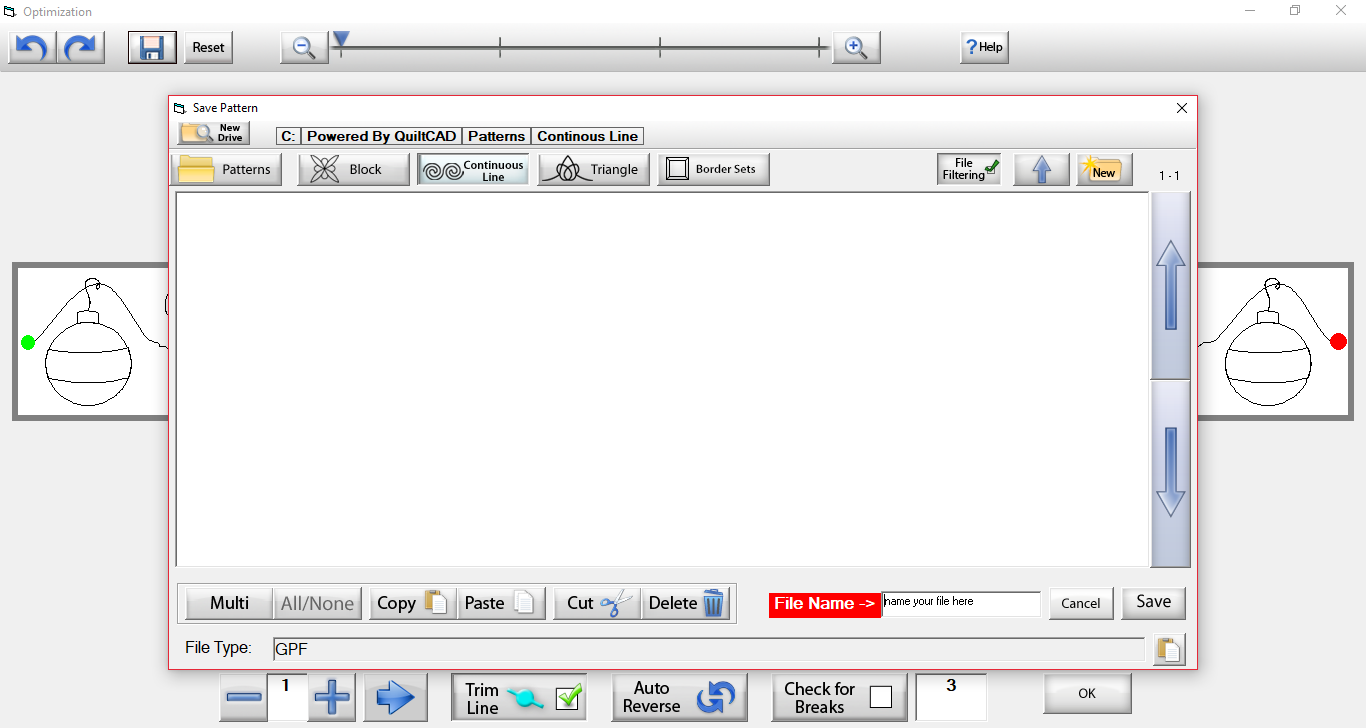
From the Optimize screen you may click to remove thread breaks and
then save your customized panto by clicking on the Blue Disk on the toolbar.  


Most importantly don’t be afraid to explore your software.  
Quilter’s Creative Touch 4 is an extremely powerful tool and the possibilities are unlimited.

Until Next Time...
Happy Sewing....

Lisa Jo
@Neverlandstiches

Monday, August 13, 2018

Some 12 inch Quilt Block Inspiration

In order to provide some inspiration for the swap below are a couple 12 1/2 inch blocks. 

The Michigan Beauty BLock is the larger version of the block from the first week of our Loyal Union Sampler Sew Along.  

A 12 inch Michigan Beauty Block 


I am showing you two different versions.  It all a matter of fabric layout to change it up! 
Until next time...
Happy Sewing!
Lisa Jo
@neverlandstitches


Tuesday, June 5, 2018

Double Crossed Quilt Pattern

I know it's been a while since I have updated my blog, but sometimes life gets busy (graduations, weddings, and family emergencies).  However, I finaly had a day to start sewing my latest quilt design.


Here's the digital rendering of my quilt Double Crossed.  A 64 x 64 inch - Throw quilt using 16 - 14 inch blocks with a  FQ bundles and 1 1/2 yards for the background. The block uses 3 inch and 2 1/2 inch strips.

A single block looks like this: 

Beautifully simple!  These blocks go together very quickly and I just adore that they make a secondary design - how fun! 


Cut the following pieces: 


  • Piece A - (8) - 3 x 5 inch rectangles of your background 
  • Piece B - (4) - 3 x 7 1/2 inch rectangles for your center cross )2 of each contrasting fabrics)
  • Piece C - (4) 2 1/2 x 5 inch rectangles for your corners to create the seconary smaller cross  design (2 of each contrasting fabrics)
Ready to start sewing (all seams are 1/4 inch and always sew right sides together)
  1. Sew your 4 piece C's to 4 of your piece A's along the 5 inch edge and press as desired.
  2. Sew the last 4 piece C's to the top of the piece AC units so that your piece A's are to the left. Press as desired
  3. Sew the piece B's to the long background edges (the two C edges) of the units you just have sewn together. and press. 

Now lets start assembling your block: 
  1. Sew the 2 of the units together so the the long edge of piece B is sewn to the BC edge of the oposite unit. Press as desired. 
  2. Sew the two large sections together so the long edges of B are top and bottom, oposite of each other. Press as desired. 

Your block should meassure 14 1/2 inches square. Now make 15 more or 19 more if you'd like to make a longer quilt. 

Add boarders as desired.  I opted to add an additional row and skip the boarders as I was too excited to complete my quilt.

I currently have 16 fun scrappy blocks sewn together using various cream and white low volume fabrics.   Big debate - do I make mine bigger or just start adding boarders?  

Coming later this week at the eldest child's request - a jelly roll friendly version with 12 inch blocks.  Here's a sneak peak of my version using a jellyroll of Sweetwater's Authentic and various grey solids for the background fabrics.


Happy sewing, until next time....
Lisa Jo 
@neverlandstitches


Tuesday, January 23, 2018

A Scrappy Log Cabin Heart Block & Quilt


UPDATE 02/08/2025 - Note that is the original Scrappy Log Cabin Heart Block. The pattern is no longer available as a free pattern due to the overwhelming amount of screenshot sharing in various facebook groups and the of plagiarism by other quilters claiming this as theirs.  

Please note that this pattern is copyrighted and may not be shared in any way, shape or form. Therefore if you have previously printed this pattern it is not to be shared.  The pattern is for your personal use only. 

If you found this pattern, through a pattern sharing group please note that it is now available in my Etsy shop for purchase.   The pattern in my Etsy shop includes the blocks instructions along with three suggested layouts and the yardage for two of the layouts. Therefore, you are purchasing three patterns for less than the price of one pattern. 

Below are three variations of quilts made using the block: 


Thanks for visiting and happy sewing...
Lisa Jo
Neverlandstitches